Hey my loves, extremely apologizing for taking to so long to get my next post out…. I’ve been dealing with some stuff and haven’t found the right time to post on here, but I trying my best to get all the content I wanted to post out within this week to make it up to you lovely people.
So I feel like this post is extremely important because if you are just getting out into the makeup world contouring your face is so difficult, I remember I always had trouble getting it right. With a lot of practice and makeup videos I was finally able to get it 100% perfect. Thats what I want to do with this post if your feeling like your contour can use some tweaks then Ill make sure I get everything down that you would need to know, lets get started…
Makeup artists use many different methods to contour the face; I prefer to use powders after I’ve applied foundation, whereas some will use a cream coverage under or over the base. Follow my tips on how to contour your face to help you achieve the look you want.
Contouring is all about creating shadow and light to alter the shape of the face, maybe to give the illusion of higher cheekbones, a slimmer face or shorten the nose.
Different face shapes need different contouring or shaping, some will need more highlighting while others will use more contouring to help create the shape you are after.
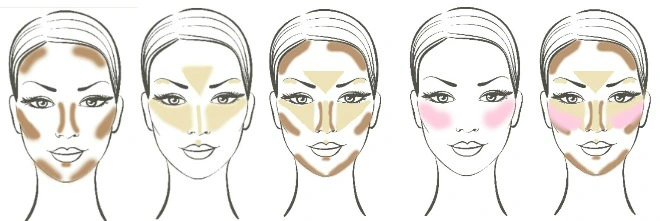
First thing to decide is what is your face shape, then be guided by this diagram as to where to contour, where to highlight or maybe just use blusher.
BASIC STEPS IN HOW TO CONTOUR
- Sweep your contour colour under your cheekbone using a soft, angled brush. You can find your cheekbone easily using your fingers – the colour should go in the hollow just beneath it. At this point the colour will look quite strong, but don’t panic! This is where we blend; using your fingers, blend the line upwards. If you blend down, you will lose the height of your cheekbone and your face will just look muddy.
- Blend the contour colour into the hairline. This will help give your skin a healthy glow and disguise a large or flat forehead.
- To make your nose look straighter, use your fingers to rub a little contour powder along the sides of your nose. Blend well. Don’t go right to the tip of your nose or it will end up looking too thin. If you want your nose to appear shorter, run a little contour along the nostrils.
- If your chin is starting to droop a little, just sweep a touch of contour powder under the jaw line to instantly hide any saggy bits and look years younger.
- My top tip when contouring: to get that celebrity look, brush a little bit of the contour powder above the inner corner of your eye up to the brow – you’ll instantly see your eyes look more defined and really pop!
BASIC STEPS IN HOW TO HIGHLIGHT
- Highlighter reflects the light well, so only apply it to the places you want to draw attention to. Sweep it above the cheekbone, along the brow bone and down the centre of your nose to give the impression of a rounded surface.
- As a finishing touch, dab a little bit of highlighter onto your cupid’s bow (the little dip in your upper lip).
- TOP TIP: to make your cheekbones really stand out, using a large powder brush, sweep a loose face powder like my INVISIBLE VEIL POWDER along the lower jaw, under where we’ve applied the contour for the cheekbone.
Contouring an Oblong or Square Face
Start by contouring the corners of your face to make them appear less angular, slim your face down and give it a softer edge. By adding highlight to your forehead and chin you give your face more dimension and a less flat appearance.
Contouring a Heart Shape
As your face is quite angular to start off with, you are just the features of your face. Highlighting under the eye area will bring cheekbones forwards, detracting away from the width of your face, by highlighting your forehead and chin your adding more definition and give a gentle sheen to the skin. With contouring successfully you can narrow a wide forehead, soften a strong jaw line and draw the eye away from a strong or prominent chin.
Contouring a Triangular Face
The reason for contouring is to bring the narrow and broad areas into proportion with each other in order to appear similar to the oval shaped face. Contour along the jaw line and highlight at the temples makes these areas more prominent and balances out the middle portion of the face. Highlight under the eyes to give your face the illusion of cheekbones
Contouring a Round Face
As your face is round you need to add some structure back into your face so it appears more oval. You will need quite a bit of contouring on the temples, cheekbones and the sides of the jawline which will give you more definition. Use the highlighter on your chin and forehead which will bring these areas forward and create angles to the face. You can also create fuller looking lips by highlighting you Cupid’s bow.
Contouring an Oval Face
By highlighting successfully you will bring areas of your face into focus and make them more prominent. If it’s cheekbones you are after then contour similar to the Round face shape.

hope you enjoyed
xo
makeupbyseanna

So helpful
LikeLiked by 1 person
A very helpful post, I’ve never seen someone talk about different face shapes before xx
LikeLiked by 1 person
So happy you enjoy it xoxo
LikeLiked by 1 person
Brilliant and helpful! Thank you!
LikeLiked by 1 person
Youre very welcome glad you enjoy!
LikeLiked by 1 person