Extremely sorry for the late post, as I promised I was going to post yesterday night but ended up being super busy.. with that being said I decided to make todays post longer.
1.Repurposed plastic spoon
Use a plastic spoon to easily apply mascara on your bottom lashes without getting any on the skin under your eyes. It also helps you to accomplish a much thicker coat. If you find your under eyes to be a complete mess after applying eyeshadow and mascara, try it out!
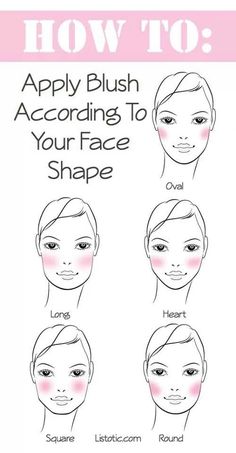
2. Blush for your face type
In order to apply blush where it will be most flattering on you, first determine your face shape. Blush not only adds color, but also contours and defines your cheek bones. The way you apply your blush can accentuate your best features and also soften those that are perhaps too prominent.
3. Scotch tape eye stencil
This unconventional beauty aid will help guide you when applying eye liner and shadows, especially if you’re going for a more daring look such as the “cat eye”. It will also help you achieve an even and balanced look for both eyes.
4.Disguising under eye bags
Most of us tend to just sweep a layer of concealer to the entire under eye area, but to really conceal bags, it’s best to highlight the crease and then apply a darker shade to the actual puffy area.
5. Eye highlights
The placement of highlights is very important when trying to create naturally beautiful eye makeup. Your lighter colors (whites, creams, and pearls) should be applied to the inner corners, the middle of the eye, and just under your brow bone. Apply your lightest colors first, and then move on to your darker shades.
6. How to fix clumpy mascara
Let’s face it, this happens to every tube of mascara over time. The problem is it dries out and then starts to form unattractive lumps. To help prevent this, don’t pump your mascara trying to get more on your wand; you’re basically pumping air into the tube causing it to dry out even faster.
Although mascara should be replaced every 3 to 4 months, I used to replace mine much sooner just because it dries out so fast and creates undesirable results. But, there’s an easy fix for that! Add a drop or two of Visine (or any brand of eye drops) into the tube, and then rub the wand around inside. The Visine softens the mascara liquid, making it apply as if it were a brand new tube!
7. Lipstick ready
Use a baby toothbrush to exfoliate your lips. To really get the job done, you can make a homemade lip exfoliate with sugar, honey and coconut oil, or easier but not as effective, cover your lips in lip balm or petroleum jelly before scrubbing.
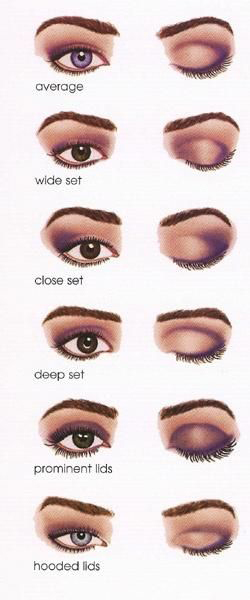
8. Make the best of your eye shape
As important as your color choices are, the placement of your shadows and liners is just as critical; you can create just about any illusion that you want. With careful placement, you can make your eyes appear wider, closer set, more prominent, deeper set, etc. Determine what shape of eyes you have, and then accentuate them accordingly.
9. Make eyes appear bigger
If you don’t already own a nude pencil, invest in one now just for this simple trick! Instead of lining your water line with dark eyeliner, use a nude pencil to create the illusion of a bigger eye. If you squint your eyes a little at this picture comparison, you’ll see what a difference it really makes. A white liner also works well if you are really fair-skinned.
10. Tightlinging
What is tightlining? It’s a way of applying your liner right in between your lashes. This is a great way to appear as though you’re not wearing any makeup at all, yet adding a little bit of color and definition to your eyes, and making the base of your lashes appear thicker.
11. Make eyeshadow pop
Have you ever purchased a vibrant color of shadow that once applied appears rather dull? The key to making those colors pop is a white base. Use a white eyeliner and cover your entire lid before applying the color of your choice.
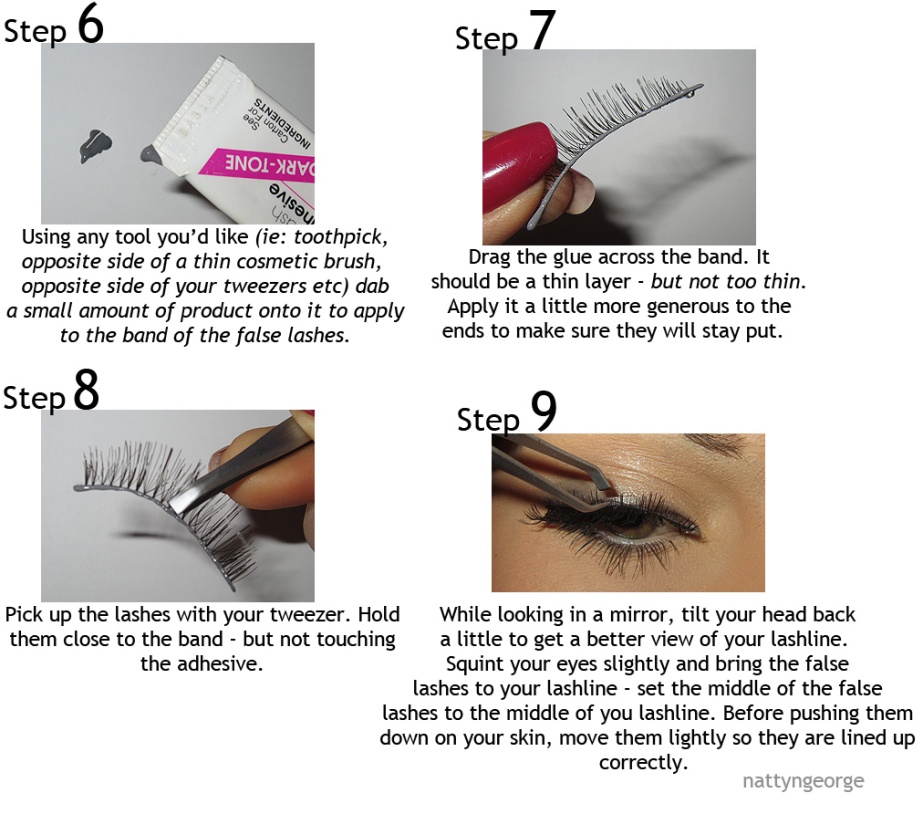
12. The false eyelash look
False lashes can be a pain, not to mention time consuming! Here are a few ways to get the look without the hassle:
1. After curling your lashes, apply a thin layer of powder before applying your mascara. I just sweep a small blending brush across my compact and apply it to the top and bottom of my eyelashes. I’ve also heard that some people use baby powder, although I think they both have virtually the same effect; creating a base that makes them appear much fuller.
2. Apply two coats of mascara to the bottom and TOP side of your lashes, but wait 3-5 minutes in between each coat, otherwise they tend to get clumpy (not cute).
3. When applying your mascara, you don’t want to just move your mascara wand from the base of your lashes up. Make sure you are moving the mascara wand back and forth while going up. The left and right motion will make sure every lash is covered entirely, all the way to the tip.
4. Almost done! Now, check your lashes for any gaps. Use the tip of your wand to apply another coat of mascara to individual lashes where they look sparse. Even better, use a fine tipped liquid eyeliner to fine tune and fill in any gaps.
13. Lash curling secret
Get the most out of your lash curler by pinching at the very base of your lashes, and then lifting the curler up into an inverted position. This creates double the curl and lasts much longer!
14. Heat the lash curler
Hold a blow dryer up next to your lash curler for about 3-5 seconds. The heat works the same way as it does with your curling iron, giving you those flirty lashes that will last all day.
15. The perfect match
This is the one thing that no matter how well it’s applied, if it’s the wrong color, it will look terrible! We all dread that our foundation will give us a ghost face or even worse, that dreaded orange jaw line. Because your neck isn’t exposed to the sun as much as your face, it is much better for matching your true color.
16. Business card trick
When applying mascara, hold a business card behind your lashes and apply it in a back and forth motion starting at the roots. You can really put it on this way, coating every lash fast!
17. Secret eye lift
Sweep a light pink matte pencil across the entire length of your brow bone to create the illusion of a higher arch, and then blend, blend, blend! It should not be detectable.
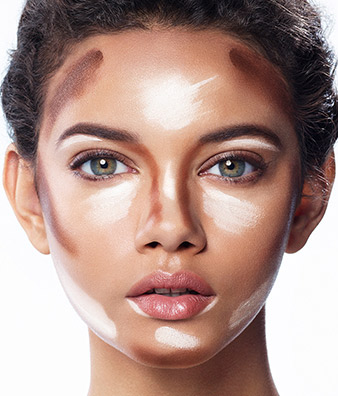
18.Proper contouring
When applied right, contouring can define your cheekbones and jaw line, reduce the look of a double chin, minimize a larger nose, and lift sagging eyes. It’s basically using makeup to highlight and accentuate your features. This is especially important for photos, as the camera tends to pick up shadows and highlights better than the naked eye.
There are actual contouring and highlighting kits (this one has the best reviews) made just for this, but you can also use a bronzer or powder that is a few shades darker than your skin, and a foundation that is a few shades lighter for highlighting. For the most part, your t-zone and under eye area is where you want to highlight, and the outer portion of your face, underneath your cheekbones, and your neck is where you want to define with a darker color. Keep in mind, blending is key for a natural look! This may take some practice at first.
19. The line saver
I’m always having to check my eyeliner because sometimes it starts to stray from where it was placed, especially in the summer months. Certain eyeliners are more prone to this, especially those that aren’t water proof, but I don’t like using waterproof makeup because it’s so darn hard to get off! I always feel like I’m ripping my lashes off in the removal process. To keep your liner behaving, sweep loose or pressed powder right underneath the eyeliner on your bottom lid. It creates somewhat of a barrier, preventing your eyeliner from traveling downward.
20. The lip cheat
As it turns out, we weren’t all blessed with Angelina Jolie’s lush lips. Now, there are a few tricks to making them appear larger (a glossy lip being one), but for a more dramatic effect, don’t be afraid to line your lips just outside of your natural line. When I say just outside of your natural line, I mean slightly. You don’t want to look like a clown by over doing it!
21. Downward strokes
Although you want to wash your face and apply your moisturizer with upwards strokes to help lessen fine lines and a sagging face, the opposite is true for foundation and powder. Most of us have a little bit of hair on our face, and it tends to grow downwards. If you apply your makeup with upward strokes, it will cause your “peach fuzz” to stick strait up, making it more noticeable.
22. Eyebrows and face shape
A lot of us ignore our eyebrows (or have over plucked them into non-existence) not realizing how important they are in defining our face. There isn’t one shape that is the best, it really just depends on your unique facial features and shape. Just like contouring, your eyebrow shape and thickness can help soften your face shape.

23. DIY tinted moisturizer
This works just as well as a B&B cream, hiding imperfections with a really natural look; simply mix your favorite facial moisturizer with a little bit of concealer. This way you can customize it with just the right amount of coverage.
24. Instant eye lift
This quick and easy illusion will give you an instant eye life. Draw an arch directly above your eyebrow with your favorite highlighter, and blend with your finger. This makes your arch look raised, making the whole eye area look like it has been lifted.
25. Wash and save your wands
Instead of tossing them in the trash when your mascara expires, wash and repurpose those wands! You can use them as an eyebrow brush, even applying a bit of color before sweeping across your brows. Or, spray with hairspray and use them to brush and keep your eyebrows in place.
26. Clump free lashes
It may seem like a waste, but if you want clump-free lashes (so hard to achieve, right?!) , you have to wipe your mascara wand off on a tissue before each application. This way you can apply several coats seamlessly.
27. Blemish secret
Instead of using that bulky tube of concealer to cover your blemishes, rub a bit of it on an eyeliner brush (or any slender brush) for more precise control. Don’t forget to blend the edges with your finger!
28. Soften the line
Although I like liquid liner and its ability to really define the eyes, I’m not really a fan of the harshness of it. And, if it’s not applied perfectly, imperfections really stand out. To soften the look, sweep a metallic brown shadow over the liner. This not only diminishes the hard-line, but also helps hide imperfections.
29. Make it last
Keep those lips kissable by sealing the deal. After your lipstick is applied, hold a tissue over your lips and apply powder over the tissue. This creates a matte look that lasts much longer.
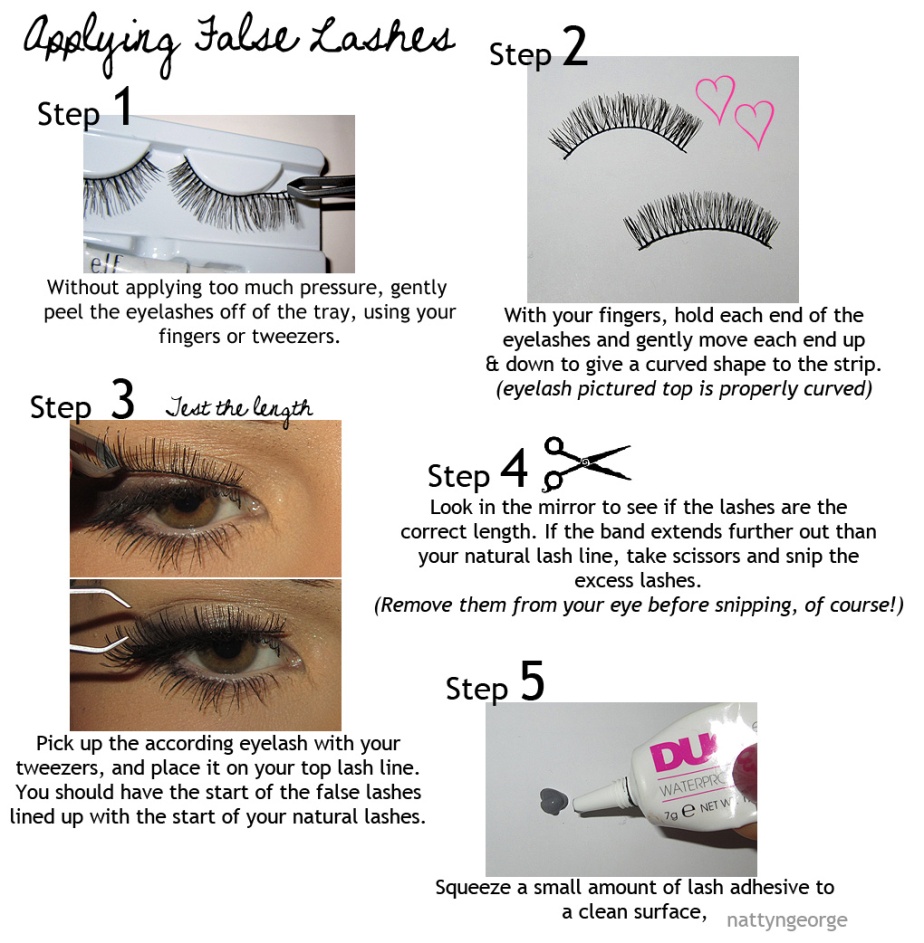
30. False eyelashes 101
If you’ve ever attempted this beauty-aid, you know that it can be quite trying! But, false eye lashes can bring your look from drab to fab in just a few patient minutes, and is definitely worth the time for special occasions. The key is knowing how to apply them from the get-go, otherwise your frustration will prevail.
31. The 3D lip effect
So simple and stunning! Use your finger to stamp a little bit of frosted blush or eye shadow to the center of your bottom and top lip.
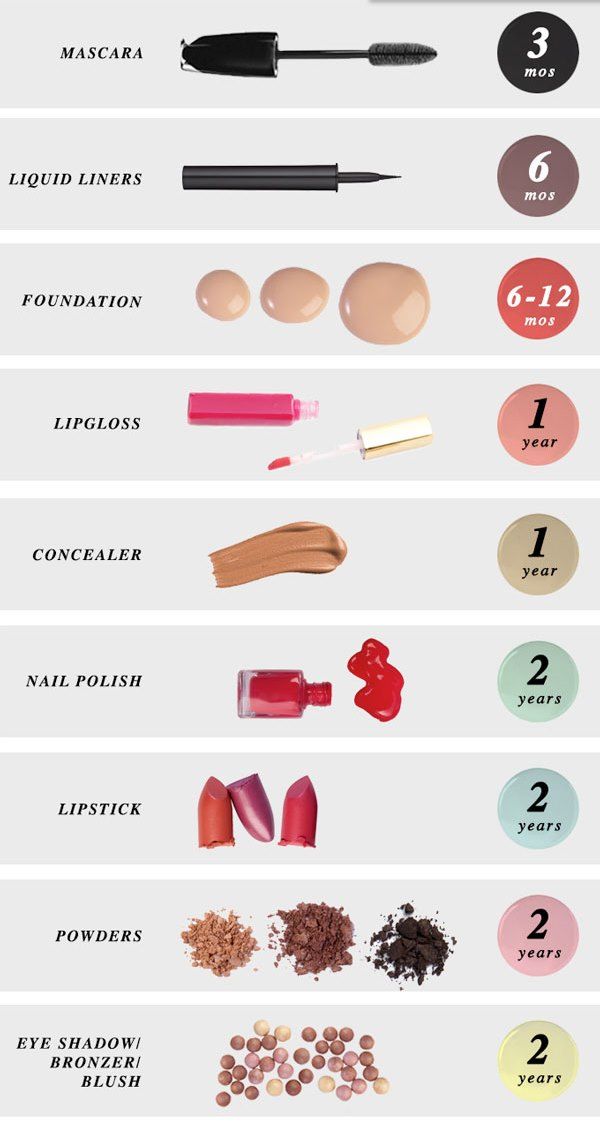
32. When to toss it
As much money as we spend on our beauty products, it’s hard to let it go, but at some point your makeup becomes unhealthy for your skin and eyes. This is especially true for anything that gets applied around your eyes, so it’s important to give your makeup drawer a good clean out every once in a while.
hope you enjoyed!
check out my previous blogs and makeup looks
stay watching put for my next tips blog
xo
makeupbyseanna

Super helpful! Will definitely try #14 & #29 🙂
LikeLiked by 1 person
So happy I could help, they defs work!
LikeLike
Inglot’s Duraline is also great for reviving mascara, liquid liner, and gel liners!! It’s only $10 too!
LikeLiked by 1 person